11 KiB
lab
| lab | ||||
|---|---|---|---|---|
|
Lab 01 - Manage Microsoft Entra ID Identities
Lab requirements
This lab requires an Azure subscription. You must have access to the Azure portal and the ability to create group accounts.
Estimated timing: 40 minutes
Lab scenario
Your organization is building out a new lab environment for pre-production testing of apps and services. A few engineers are being hired to manage the lab environment, including the virtual machines. In order to allow the engineers to authenticate by using Microsoft Entra ID, you have been tasked with provisioning users and group accounts. To minimize administrative overhead, membership of the groups should be updated automatically based on job titles. You also need to know how to delete users to prevent access after an engineer leaves your organization.
Interactive lab simulation
An interactive lab simulation is available for this topic. The simulation lets you to click through a similar scenario at your own pace. There are differences between the interactive simulation and this hosted lab, but the core concepts and ideas being demonstrated are the same. An Azure subscription is not required.
Tasks
- Task 1: Familiarize yourself with the Azure portal.
- Task 2: Create a resource group.
- Task 3: Familiarize yourself with user accounts and group membership.
- Task 4: Create security groups with assigned or dynamic membership.
- Task 5: Familiarize yourself with the Cloud Shell.
- Task 6: Practice with Azure PowerShell.
- Task 7: Practice with Bash.
Architecture diagram

Task 1: Familiarize yourself with the Azure portal.
In this task, you familiarize yourself with the Azure portal. The Azure portal is a web-based, unified console that provides an alternative to command-line tools. With the Azure portal, you can manage your Azure subscription using a graphical user interface. You can build, manage, and monitor everything from simple web apps to complex cloud deployments in the portal.
-
Sign in to the Azure portal -
http://portal.azure.com. -
Begin your tour of the Azure portal, by selecting the top left menu icon.
- Select Home to view recent services and resources. You can also create favorites.
- Select Dashboard for a customized view. Dashboards are a focused and organized view of your cloud resources in the Azure portal. Use dashboards as a workspace where you can monitor resources and quickly launch tasks for day-to-day operations.
- Select All services to view a categorized list of Azure services.
-
You may find it quicker to Search resources, services, and docs using the search box in the top center of the portal. The search box provides autocomplete and suggestions for services or resources. For example, try
virtand notice the suggested matches. -
On the right side of the top menu bar, select the Settings icon. Settings lets you customize the portal appearance, language and region.
-
Lastly, in the top right corner is your user account information.
Task 2: Create a new resource group.
In this task, you create a new resource group. A resource group is a grouping of related resources (such as all the resources for a project, a department, or an application). For each lab in this course you create a resource group.
-
In the Azure portal, search for and select Resource groups.
-
On the Resource groups blade, click + Create, and provide the required information.
Setting Value Subscription name Resource group name az104-rg1Location -
Click Review + create and then click Create.
Note
: Wait for the resource group to deploy. Use the Notification icon (top right) to track progress of the deployment.
-
Back on the Resource groups blade, refresh the page and verify your new resource group appears in the list of resource groups.

Task 2: Familiarize yourself with user accounts and group membership.
In this task, you familiarize yourself with user account and profiles. You also view group membership.
-
In the Azure portal, search for and select
Microsoft Entra ID. -
In the Manage section, select the Users blade.
-
Select New user from the top menu. Notice the selections for Create new user and Invite external user.
-
Search for and select your user account. Your user account is shown in the upper right corner of the portal.
-
Select the Properties tab and review all the profile information that can be provided for a user account.
-
In the Manage section, select Groups. If you are part of a group, select the group.
-
Notice the group information like Membership type, Source, and Type. Also notice, the number of members in the group.
Task 4: Create groups with assigned and dynamic membership.
In this task, you create a group. Groups are used for user accounts or devices. Some groups have members that are statically assigned. Some groups have members that are dynamically assigned. Dynamic groups update automatically based on the properties of user accounts or devices. Static groups require more administrative overhead (administrators have to add and remove members manually).
-
In the Azure portal, search for and select Groups.
-
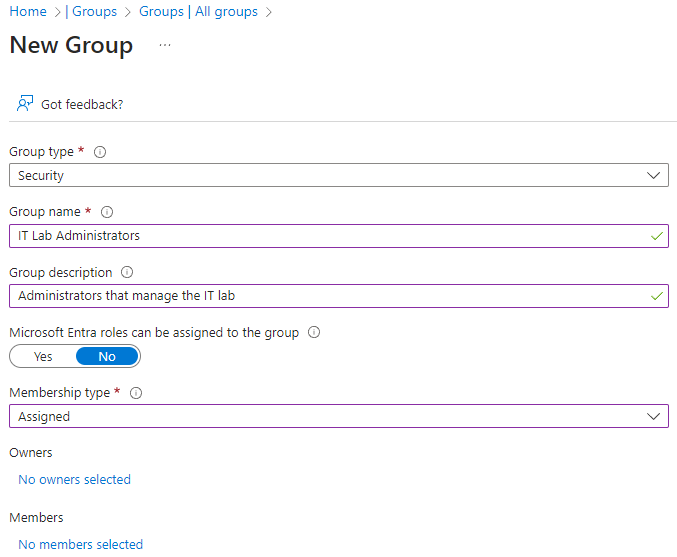
Select + New group and create a new group.
Setting Value Group type Security Group name IT Lab Administrators(adjust the name if this one is not available)Group description Administrators that manage the IT labMembership type Assigned Note
: Your Membership type drop-down list might be grayed out. This is where you can switch from an assigned group to a dynamic group. This requires an Entra ID Premium P1 or P2 license.
-
Click No members selected.
-
From the Add members blade, search for your user account. Select your user account to add to the group.
-
Click Create to finish creating the group.
Task 4: Configure the Cloud Shell.
In this task, you work with the Azure Cloud Shell. Azure Cloud Shell is an interactive, authenticated, browser-accessible terminal for managing Azure resources. It provides the flexibility of choosing the shell experience that best suits the way you work, either Bash or PowerShell.
-
Select the Cloud Shell icon in the top right of the Azure Portal. Alternately, you can navigate directly to
https://shell.azure.com.
-
When prompted to select either Bash or PowerShell, select PowerShell. Bash is used in the next task.
Did you know? If you mostly work with Linux systems, Azure CLI feels more natural. If you mostly work with Windows systems, Azure PowerShell feels more natural.
-
On the You have no storage mounted screen select Show advanced settings and provide the required information. When completed select Create storage.
Settings Values Resource Group Create new resource group Storage account (Create a new account a use a globally unique name (ex: cloudshellstoragemystorage)) cloudshellxxxxxxx File share (create new) shellstorage Note: If you are working in a hosted lab environment, you need to configure cloud shell storage each time a new lab environement is created.
Note: Task 5 let's you practice with Azure PowerShell. Task 6 let's you practice with the CLI. You may do both tasks or just the one you are most interested in.
Task 5: Practice with PowerShell.
In this task, you create a resource group and an Azure AD group by using Azure PowerShell session within Cloud Shell.
-
Continue working in the Cloud Shell. At anytime use cls to clear the command window.
-
Azure PowerShell uses a Verb-Noun format for cmdlets. For example, the cmdlet to create a new resource group is New-AzResourceGroup. To view how to use the cmdlet, run the Get-Help command.
Get-Help New-AzResourceGroup -detailed -
To create a resource group from the PowerShell session within Cloud Shell, run the following commands. Note that the commands starting with a dollar sign ($) are creating variables that you can use in later commands.
$location = 'eastus'
$rgName = 'az104-rg-ps'
New-AzResourceGroup -Name $rgName -Location $location
-
To retrieve properties of the newly created resource group, run the following command:
Get-AzResourceGroup -Name $rgName -
Let's try to create new Azure AD group.
Get-Help New-AzureADGroup -detailed -
Using the example in the help, here are the commands. Notice you must first connect to Azure AD.
``powershell Connect-AzureAD New-AzureADGroup -DisplayName "MyPSgroup" -MailEnabled $false -SecurityEnabled $true -MailNickName "MyPSgroup"
-
Return to the Azure portal. Confirm you have a new resource group and a new Azure AD group.
Task 6: Practice with Bash.
In this task, you create a resource group and an Azure AD group by using Azure CLI session within Cloud Shell.
-
Continue in the Cloud Shell. Use the drop-down to switch to Bash.
-
The Azure CLI uses an easy to read syntax for most resource types and working with those resources. For example, to interact with resource groups, the command is az group.
az group --help -
The create option looks promising. Note the capitalized names create variables that you can reference in subsequent commands.
RGNAME='az104-rg1-cli' LOCATION='eastus' az group create --name $RGNAME --location $LOCATION -
To verify and retrieve properties for the newly created resource group, run the following command:
az group show --name $RGNAME
-
Let's use help to learn more about creating an Azure AD group.
az ad group --help -
Now create the group and list the groups to verify.
az ad group create --display-name MyCLIgroup --mail-nickname MyCLIgroup az ad group list -
Return to the Azure portal. Confirm you have a new resource group and a new Azure AD group.
Review
Congratulations! You have familiarized yourself with the Azure portal, Cloud Shell, Azure PowerShell, and the CLI. You have also created a group and assigned a member.