16 KiB
lab
| lab | ||||
|---|---|---|---|---|
|
Lab 08 - Manage Virtual Machines
Estimated timing: 40 minutes
Lab scenario
Your organization wants to explore deploying and configuring Azure virtual machines. First, you need to determine different compute and storage resiliency and scalability options you can implement when using Azure virtual machines. Next, you need to investigate compute and storage resiliency and scalability options that are available when using Azure virtual machine scale sets.
Interactive lab simulations
There are interactive lab simulations that you might find useful for this topic. The simulation lets you to click through a similar scenario at your own pace. There are differences between the interactive simulation and this lab, but many of the core concepts are the same. An Azure subscription is not required.
- Create a virtual machine in the portal. Create a virtual machine, connect and install the web server role.
- Deploy a virtual machine with a template. Explore the QuickStart gallery and locate a virtual machine template. Deploy the template and verify the deployment.
- Create a virtual machine with PowerShell. Use Azure PowerShell to deploy a virtual machine. Review Azure Advisor recommendations.
- Create a virtual machine with the CLI. Use the CLI to deploy a virtual machine. Review Azure Advisor recommendations.
Exercise 1: Azure Virtual Machines Architecture Diagram

Tasks
- Task 1: Deploy zone-resilient Azure virtual machines by using the Azure portal
- Task 2: Manage compute and storage scaling for virtual machines
Task 1: Deploy zone-resilient Azure virtual machines by using the Azure portal
In this task, you will deploy two Azure virtual machines into different availability zones by using the Azure portal. Availability zones offer the highest level of uptime SLA for virtual machines at 99.99%. To achieve this SLA, you must deploy at least two virtual machines across different availabiliy zones.
-
Sign in to the Azure portal -
https://portal.azure.com. -
Search for and select
Virtual machinesand, on the Virtual machines blade, click + Create, and then select in the drop-down + Azure virtual machine. -
On the Basics tab of the Create a virtual machine blade, in the Availability zone drop down menu, place a checkmark next to Zone 2. This should select both Zone 1 and Zone 2.
Note
: This will deploy two virtual machines in the selected region, one in each zone. You achieve the 99.99% uptime SLA because you have at least two VMs distributed across at least two zones. In the scenario where you might only need one VM, it is a best practice to still deploy the VM to a zone to ensure that the disk and corresponding resources are colocated in the same zone.
-
On the Basics tab, use the following settings to complete the fields (leave others with their default values):
Setting Value Subscription the name of your Azure subscription Resource group az104-rg8 (If necessary, click Create new) Virtual machine names az104-vm1andaz104-vm2(After selecting both availability zones, select Edit names under the VM name field.)Region East US Availability options Availability zone Availability zone Zone 1, 2 (read the note about using virtual machine scale sets) Security type Standard Image Ubuntu Server 20.04 LTS - x64 Gen2 Azure Spot instance unchecked Size Standard D2s v3 Authentication type Password Username localadminPassword Provide a secure password Public inbound ports None Would you like to use an existing Windows Server license? Unchecked 
-
Click Next: Disks > and, on the Disks tab of the Create a virtual machine blade, specify the following settings (leave others with their default values):
Setting Value OS disk type Premium SSD Enable Ultra Disk compatibility Unchecked -
Click Next: Networking > take the defaults but do not provide a load balancer.
| Load balancing options | None |
-
Click Next: Management > and, on the Management tab of the Create a virtual machine blade, specify the following settings (leave others with their default values):
Setting Value Patch orchestration options Azure orchestrated -
Click Next: Monitoring > and, on the Monitoring tab of the Create a virtual machine blade, specify the following settings (leave others with their default values):
Setting Value Boot diagnostics Disable -
Click Next: Advanced >, on the Advanced tab of the Create a virtual machine blade, review the available settings without modifying any of them, and click Review + Create.
-
On the Review + Create blade, click Create.
Note: Monitor the Notification messages, and wait for the deployment to complete.
Task 2: Manage compute and storage scaling for virtual machines
In this task, you will scale the compute for a virtual machine by adjusting its size to a different SKU. Azure provides flexability in VM size selection so that you can adjust a VM for periods of time if it needs more (or less) compute and memory allocated. This concept is extended to disks, where you can modify the performance of the disk, or increase the allocated capacity.
-
In the Azure portal, search for and select az104-vm1.
-
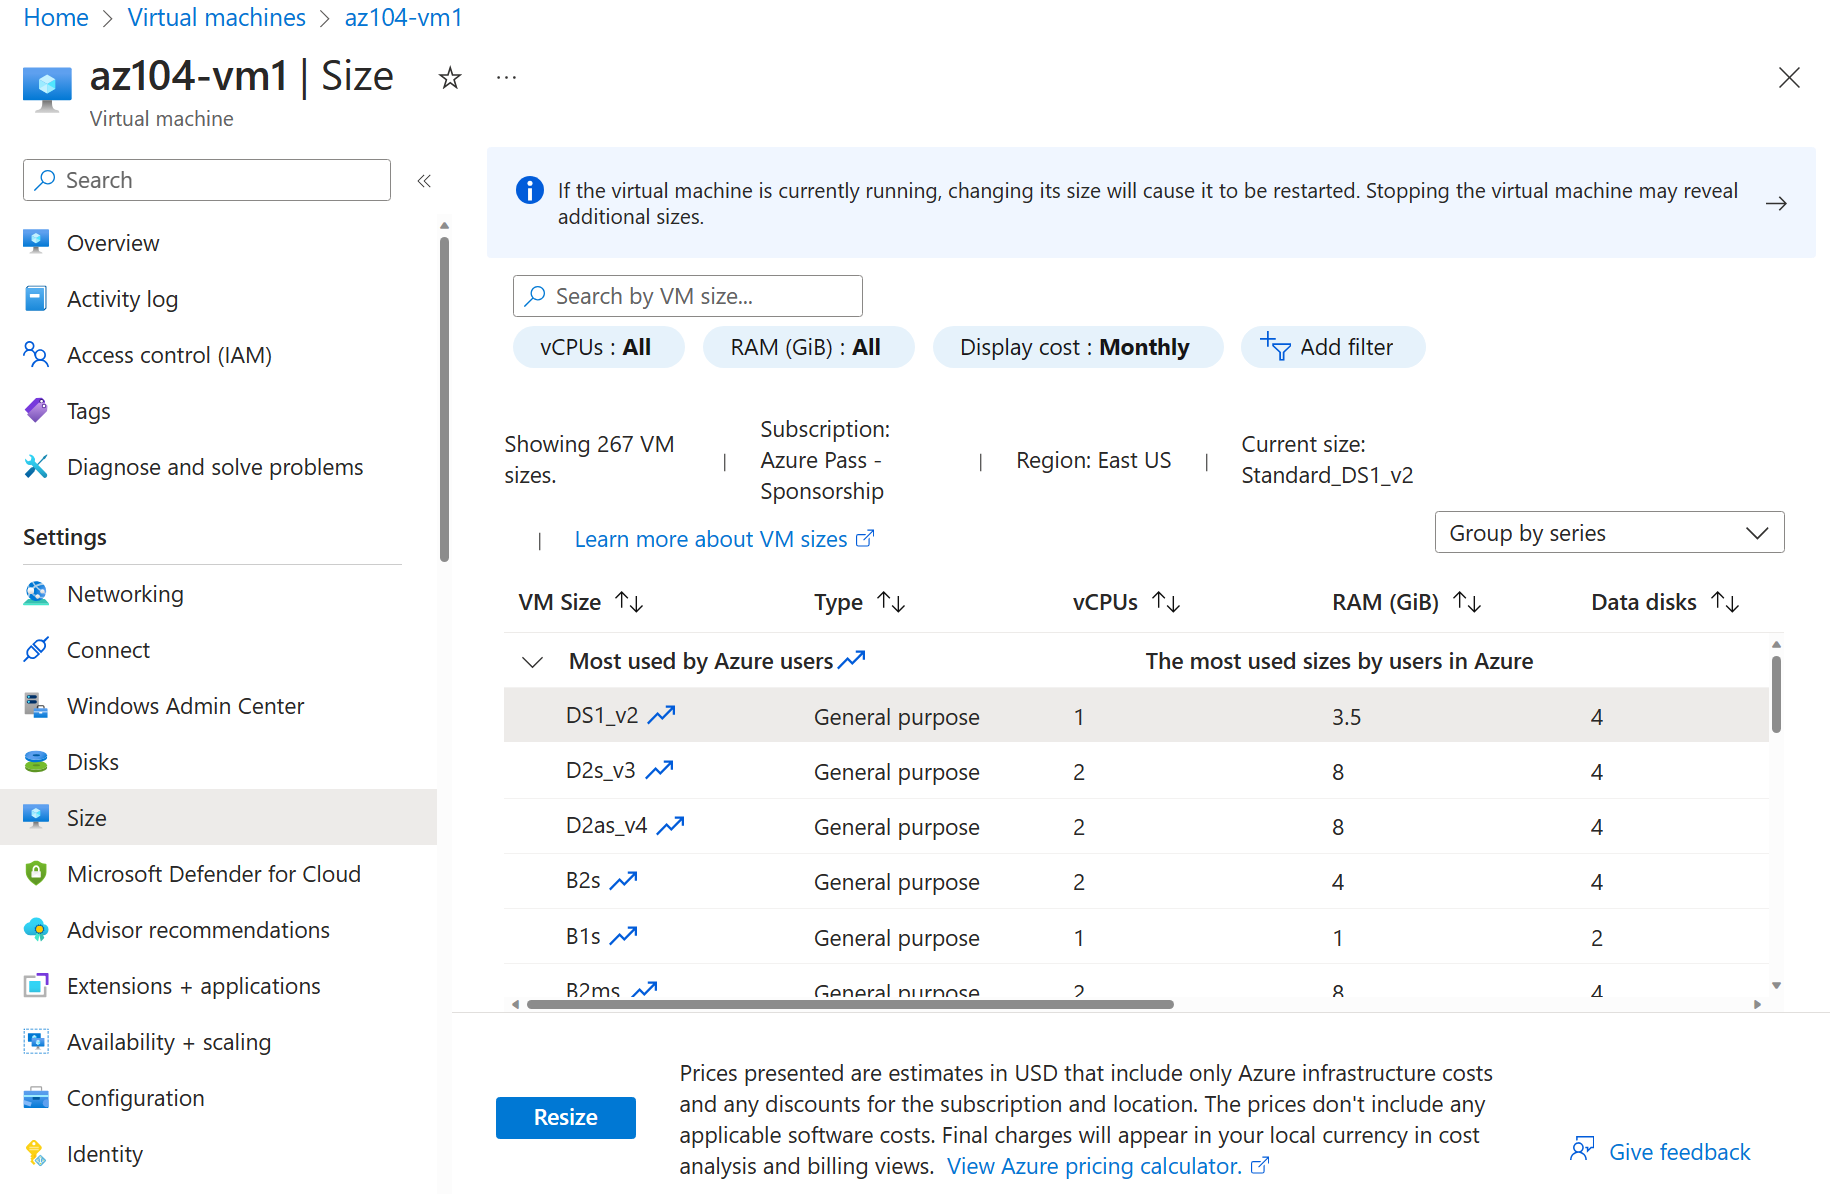
On the az104-vm1 virtual machine blade, click Size and set the virtual machine size to DS1_v2 and click Resize
Note
: Choose another size if Standard DS1_v2 is not available.
-
On the az104-vm1 virtual machine blade, click Disks, Under Data disks click + Create and attach a new disk.
-
Create a managed disk with the following settings (leave others with their default values):
Setting Value Disk name vm1-disk1Storage type Standard HDD Size (GiB) 32 -
Click Apply.
-
After the disk has been created, click Detach, and then click Apply.
Note
: You might need to scroll right to see the detach icon.
-
From the Azure portal, search for and select
Disks. -
From the list of disks, select the vm1-disk1 object.
-
From vm1-disk1, select Size + performance.
-
From Size + performance, set the storage type to Standard SSD, and then click Save.
Note
: You cannot change the storage type of the disk while it is attached or while the VM is running.
-
Navigate back to the az104-vm1 virtual machine, and select Disks.
-
Verify the disk is now Standard HDD.
Exercise 2: Azure Virtual Machine Scale Sets Architecture Diagram
Tasks
- Task 1: Implement Azure Virtual Machine Scale Sets
- Task 2: Scale Azure Virtual Machine Scale Sets
Task 1: Implement Azure Virtual Machine Scale Sets
In this task, you will deploy an Azure virtual machine scale set across availability zones. With individual VMs, you would need other automation to deploy and configure additional VMs if your application needs additional compute. VM Scale Sets reduce the administrative overhead of automation by enabling you to configure metrics or conditions that allow the scale set to automatically scale up or down the number of VMs in the set.
-
In the Azure portal, search for and select
Virtual machine scale setsand, on the Virtual machine scale sets blade, click + Create. -
On the Basics tab of the Create a virtual machine scale set blade, specify the following settings (leave others with their default values) and click Next : Spot >:
Setting Value Subscription the name of the your Azure subscription Resource group az104-rg8 Virtual machine scale set name vmss1Region East US (or a region near you) Availability zone Zones 1, 2, 3 Orchestration mode Uniform Security type Standard Image Windows Server 2019 Datacenter - x64 Gen2 Run with Azure Spot discount Unchecked Size Standard D2s_v3 Username localadminPassword Provide a secure password Already have a Windows Server license? Unchecked Note
: For the list of Azure regions which support deployment of Windows virtual machines to availability zones, refer to What are Availability Zones in Azure?

-
On the Spot tab, accept the defaults and select Next: Disks >.
-
On the Disks tab, accept the default values and click Next : Networking >.
-
On the Networking tab, click the Create virtual network link below the Virtual network textbox and create a new virtual network with the following settings (leave others with their default values). When finished, select OK.
Setting Value Name vmss-vnetAddress range 10.82.0.0/20Subnet name subnet0Subnet range 10.82.0.0/24 -
In the Networking tab, click the Edit network interface icon to the right of the network interface entry.
-
On the Edit network interface blade, in the NIC network security group section, click Advanced and click Create new under the Configure network security group drop-down list.
-
On the Create network security group blade, specify the following settings (leave others with their default values):
Setting Value Name vmss1-nsg -
Click Add an inbound rule and add an inbound security rule with the following settings (leave others with their default values):
Setting Value Source Any Source port ranges * Destination Any Service HTTP Action Allow Priority 1010 Name allow-http -
Click Add and, back on the Create network security group blade, click OK.
-
In the Edit network interface blade, in the Public IP address section, click Enabled and click OK.
-
In the Networking tab, under the Load balancing section, specify the following (leave others with their default values).
Setting Value Load balancing options Azure load balancer Select a load balancer Create a load balancer -
On the Create a load balancer page, specify the load balancer name and take the defaults. Click Create when you are done then Next : Scaling >.
Setting Value Load balancer name vmss-lb -
On the Scaling tab, specify the following settings (leave others with their default values) and click Next : Management >:
Setting Value Initial instance count 2Scaling policy Manual -
On the Management tab, specify the following settings (leave others with their default values):
Setting Value Boot diagnostics Disable -
Click Next : Health >:
-
On the Health tab, review the default settings without making any changes and click Next : Advanced >.
-
On the Advanced tab, click Review + create.
-
On the Review + create tab, ensure that the validation passed and click Create.
Note
: Wait for the virtual machine scale set deployment to complete. This should take appoximately 5 minutes.
Task 2: Scale Azure Virtual Machine Scale Sets
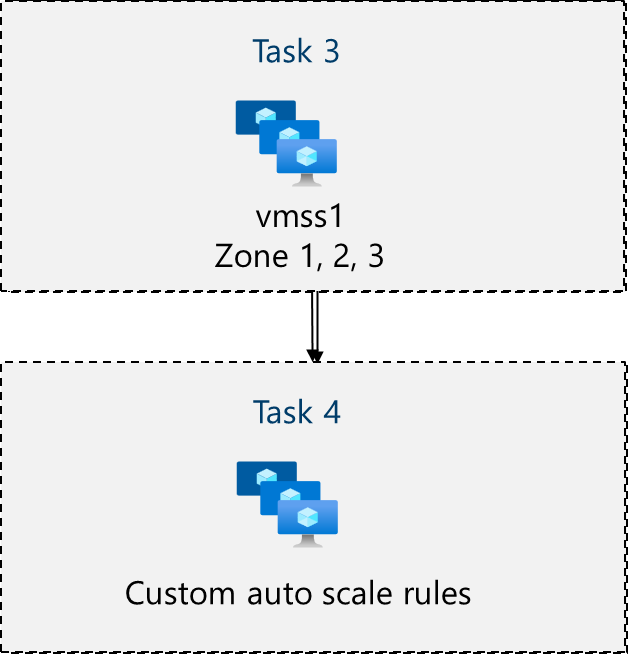
In this task, you scale the virtual machine scale set using a custom scale rule.
-
Select Go to resource or search for and select the vmss1 scale set.
-
Choose Scaling from the menu on the left-hand side of the scale set window.
-
Notice the Scale mode can be Scale based on metrics or Scale to a specific instance count. In scale sets with a small number of VM instances, increasing or decresing the instance count may be best. In scale sets with a large number of VM instances, scaling based on metrics may be more appropriate.
-
Select the button to Custom autoscale. Then select Add a rule.
Scale out rule
-
Let's create a scale out rule that automatically increases the number of VM instances. This rule scales out when the average CPU load is greater than 70% over a 10-minute period. When the rule triggers, the number of VM instances is increased by 20%. Click Add after making your selections.
Setting Value Metric source Current resource (vmss1) Metric namespace Virtual Machine Host Metric name Percentage CPU (review your other choices) Operator Greater than Metric threshold to trigger scale action 70 Duration (minutes) 10 Time grain statistic Average Operation Increase percent by (review other choices) Cool down (minutes) 5 Percentage 20 
Scale in rule
-
During evening or weekends, demand may decrease so it is important to create a scale in rule.
-
Let's create a rule that decreases the number of VM instances in a scale set. The number of instances is decreased when the average CPU load drops below 30% over a 10-minute period. When the rule triggers, the number of VM instances is decreased by 20%. Adjust the settings, then select Add.
Setting Value Operator Less than Threshold 30 Operation decrease percent by (review your other choices) Instance count 20
Set the instance limits
-
When your autoscale rules are applied, instance limits make sure that you do not scale out beyond the maximum number of instances, or scale in beyond the minimum of instances.
-
Instance limits are shown on the Scaling page after the rules.
Setting Value Minimum 2 Maximum 10 Default 2 -
Be sure to Save your changes
-
On the vmss1 page, select Instances. This is where you would monitor the number of virtual machine instances.
Review the main points of the lab
Congratulations on completing the lab. Here are the main takeaways for this lab.
- Azure virtual machines are on-demand, scalable computing resources.
- Configuring Azure virtual machines includes choosing an operating system, size, storage and networking settings.
- Azure Virtual Machine Scale Sets let you create and manage a group of load balanced VMs.
- The virtual machines in a Virtual Machine Scale Set are created from the same image and configuration.
- In a Virtual Machine Scale Set the number of VM instances can automatically increase or decrease in response to demand or a defined schedule.
Cleanup your resources
If you are working with your own subscription take a minute to delete the lab resources. This will ensure resources are freed up and cost is minimized. The easiest way to delete the lab resources is to delete the lab resource group.
-
In the Azure portal, select the resource group, select Delete the resource group, Enter resource group name, and then click Delete.
-
Using Azure PowerShell,
Remove-AzResourceGroup -Name resourceGroupName. -
Using the CLI,
az group delete --name resourceGroupName.