13 KiB
lab
| lab | ||||
|---|---|---|---|---|
|
Lab 01 - Manage Microsoft Entra ID Identities
Lab introduction
This is the first in a series of labs for Azure Administrators. In this lab, you learn about users and groups. Users and groups are the basic building blocks for an identity solution. You also get familiar with basic administrator tools.
This lab requires an Azure subscription. Your subscription type may affect the availability of features in this lab. You may change the region, but the steps are shown in East US.
Estimated timing: 30 minutes
Lab scenario
Your organization is building a new lab environment for pre-production testing of apps and services. A few engineers are being hired to manage the lab environment, including the virtual machines. To allow the engineers to authenticate by using Microsoft Entra ID, you have been tasked with provisioning users and group accounts. To minimize administrative overhead, membership of the groups should be updated automatically based on job titles. You also need to know how to delete users to prevent access after an engineer leaves your organization.
Interactive lab simulation
There are interactive lab simulations that you might find useful for this topic. The simulation lets you to click through a similar scenario at your own pace. There are differences between the interactive simulation and this lab, but many of the core concepts are the same. An Azure subscription is not required.
- Manage Entra ID Identities. Create and configure users and assign to groups. Create an Azure tenant and manage guest accounts.
Architecture diagram
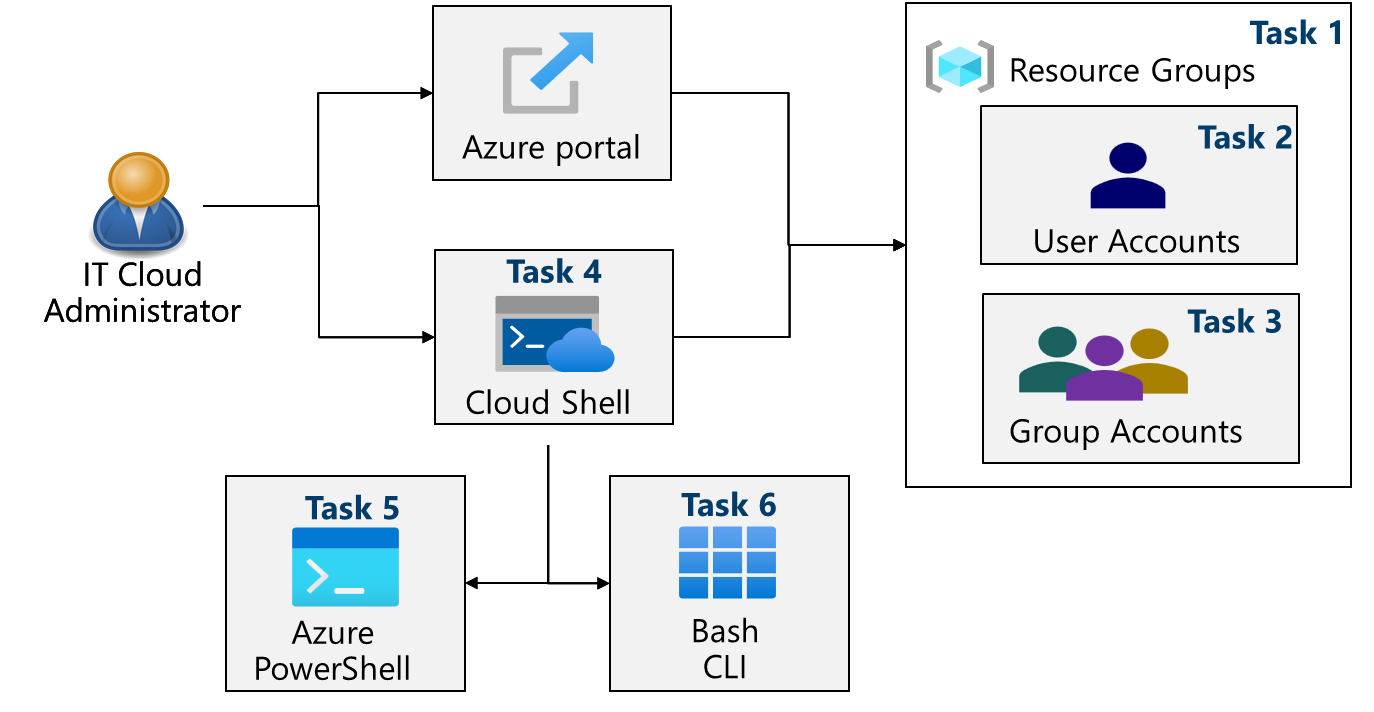
Tasks
- Task 1: Create a resource group.
- Task 2: Create and configure user accounts.
- Task 3: Create groups and add members.
- Task 4: Familiarize yourself with the Cloud Shell.
- Task 5: Practice with Azure PowerShell.
- Task 6: Practice with the Bash shell.
Task 1: Create a resource group
In this task, you create a resource group. A resource group is a grouping of related resources. For example, all the resources for a project, a department, or an application.
Note: For each lab in this course you will create a new resource group. This lets you quickly locate and manage your lab resources.
-
Sign in to the Azure portal -
https://portal.azure.com.Note: The Azure portal is used in all the labs. If you are new to the Azure, search for and select
Quickstart Center. Take a few minutes to watch the Getting started in the Azure portal video. Even if you have used the portal before, you will find a few tips and tricks on navigating and customizing the interaface. -
In the Azure portal, search for and select
Resource groups. -
On the Resource groups blade, click + Create, and provide the required information.
Setting Value Subscription name your subscription Resource group name az104-rg1Location East US Note: All the labs use East US. Watch the Select the best region video in the Quickstart Center to learn what to consider when selecting a region.
-
Click Review + create and then click Create.
Note
: Wait for the resource group to deploy. Use the Notification icon (top right) to track the progress of the deployment.
Task 2: Create and configure user accounts
In this task, you will create and configure user accounts. User accounts will store user data such as name, department, location, and contact information.
-
Continue in the Azure portal.
-
Search for and select
Microsoft Entra ID. -
Microsoft Entra ID is Azure's cloud-based identity and access management solution. Take a few minutes to familiarize yourself with some of the features listed in the left pane.
- Administrative units lets you group users, groups, or devices into a single manageable unit.
- Licenses lets you purchase a license, manage the licenses you have, and assign licenses to users and groups.
- Self service password reset allow your users to manage their password from any device, at any time, from any location.
-
Select Users, then in the New user drop-down select Create new user. Notice the selection to Invite and external user.
-
Create a new user with the following settings (leave others with their defaults). On the Properties tab notice all the different types of information that can be included in the user account.
Setting Value User principal name az104-user1Display name az104-user1Auto-generate password de-select Initial password Provide a secure password Job title (Properties tab) Cloud AdministratorDepartment (Properties tab) ITUsage location (Properties tab) United States -
Once you have finished reviewing, select Review + create and then Create.
Note: It is unlikely you will be creating user accounts individually. Do you know how your organization plans to create and manage user accounts?
Task 4: Create groups and add members
In this task, you create a group account. Group accounts can include user accounts or devices. These are two basic ways member are assigned to groups: Statically and Dynamically. Static groups require administrators to add and remove members manually. Dynamic groups update automatically based on the properties of a user account or devices. For example, job title.
-
In the Azure portal, search for and select
Groups. -
Select + New group and create a new group.
Setting Value Group type Security Group name IT Lab Administrators(adjust the name if this one is not available)Group description Administrators that manage the IT labMembership type Assigned Note
: Notice the options in the Membership type drop-down. An Entra ID Premium P1 or P2 license is required for dynamic membership.

-
Click No members selected.
-
From the Add members blade, search for and select the az104-user1 and add them to the group.
-
Click Create to deploy the group.
-
Take a few more minutes to familiarize yourself with other group settings.
- Expiration lets you configre a group lifetime in days. The group must be renewed by the owner.
- Naming policy lets you configure blocked words and add a prefix or suffix to group names.
Note: It is likely you will be managing a large number of groups. Does your organization have a plan for creating groups and adding members?
Task 5: Familiarize yourself with the Cloud Shell.
In this task, you work with the Azure Cloud Shell. Azure Cloud Shell is an interactive, authenticated, browser-accessible terminal for managing Azure resources. It provides the flexibility of choosing the shell experience that best suits the way you work, either Bash or PowerShell. You will use this tool often in this course.
-
Select the Cloud Shell icon in the top right of the Azure Portal. Alternately, you can navigate directly to
https://shell.azure.com. -
When prompted to select either Bash or PowerShell, select PowerShell.
Did you know? If you mostly work with Linux systems, Azure CLI feels more natural. If you mostly work with Windows systems, Azure PowerShell feels more natural.
-
On the You have no storage mounted screen select Show advanced settings and provide the required information. When completed select Create storage.
Note: As you work with the Cloud Shell a storage accound and file share is required.
Settings Values Resource Group az104-rg1 Storage account (Create a new account a use a globally unique name (ex: cloudshellstoragemystorage)) cloudshellxxxxxxx File share (create new) shellstorage Note: Task 6 lets you practice with Azure PowerShell. Task 7 lets you practice with the CLI. You may do both tasks or just the one you are most interested in.
Task 6: Practice with Azure PowerShell
In this task, you create a resource group and an Azure AD group by using Azure PowerShell session within Cloud Shell. You may use Azure PowerShell scripts throughout the course.
-
Use the arrow keys to move through the command history. Use the tab key to autocomplete commands and parameters. At any time use cls to clear the command window.
-
Azure PowerShell uses a Verb-Noun format for cmdlets. For example, the cmdlet to create a new resource group is New-AzResourceGroup. To view how to use the cmdlet, run the Get-Help command.
Get-Help New-AzResourceGroup -detailed -
To create a resource group from the PowerShell session within Cloud Shell, run the following commands. Note that the commands starting with a dollar sign ($) are creating variables that you can use in later commands. Ensure you receive a succeeded message.
$location = 'eastus' $rgName = 'az104-rg-ps' New-AzResourceGroup -Name $rgName -Location $location -
To retrieve properties of the newly created resource group, run the following command:
Get-AzResourceGroup -Name $rgName -
Now, let's try to create new Azure group.
Get-Help New-AzureADGroup -detailed -
Using the example in the Help, try these commands. Notice you must first connect to Azure AD.
Connect-AzureAD New-AzureADGroup -DisplayName "MyPSgroup" -MailEnabled $false -SecurityEnabled $true -MailNickName "MyPSgroup" -
Return to the Azure portal. Confirm you have a new resource group and a new Azure group. You may need to Refresh the pages.
Task 7: Practice with the Bash shell
In this task, you create a resource group and an Azure group by using Azure CLI session within Cloud Shell. You may use Azure CLI scripts throughout the course.
-
Continue in the Cloud Shell. Use the drop-down to switch to Bash.
Note: Use the arrow keys to move through the command history. Use the tab key to autocomplete commands and parameters.
-
The Azure CLI uses an easy-to-read syntax. For example, to interact with resource groups, the command is az group.
az group --help -
The create option looks promising. Note the capitalized names create variables that you can reference in subsequent commands.
RGNAME='az104-rg1-cli' LOCATION='eastus' az group create --name $RGNAME --location $LOCATION -
To verify and retrieve properties for the newly created resource group, try the show command.
az group show --name $RGNAME -
Now, let's use help to learn more about creating an Azure group.
az ad group --help -
Create the group and list the groups to verify.
az ad group create --display-name MyCLIgroup --mail-nickname MyCLIgroup az ad group list -
Return to the Azure portal. Confirm you have a new resource group and a new Azure group. You may need to Refresh the pages.
Key takeaways
Congratulations on completing the lab. Here are some main takeways for this lab:
- The Azure portal is a good way to get started with creating and managing Azure resources. Administrators can customize the portal and share dashboards.
- Resource groups are a way of grouping of related resources,. You can use a resource group for a project, a department, or an application. This makes it easy to manage and monitor a group of related resources.
- There are different types of user accounts in Microsoft Entra ID. Each user account type has a level of access specific to the scope of work expected.
- Group accounts group together related users or devices. Group membership can be assigned statically or dynamically.
- The Cloud Shell is an interactive, authenticated terminal for managing Azure resources. The Cloud Shell provides access to Bash or Azure PowerShell.
- Azure PowerShell and Bash provide a scripted way to create resources.
Cleanup your resources
If you are working with your own subscription take a minute to delete the lab resources. This will ensure resources are freed up and cost is minimized. The easiest way to delete the lab resources is to delete the lab resource group.
- In the Azure portal, select the resource group, select Delete the resource group, Enter resource group name, and then click Delete.
- Using Azure PowerShell,
Remove-AzResourceGroup -Name resourceGroupName. - Using the CLI,
az group delete --name resourceGroupName.