12 KiB
lab
| lab | ||||
|---|---|---|---|---|
|
Lab 05 - Implement Intersite Connectivity
Student lab manual
Exercise scenario
Your organization segments core IT apps and services (such as DNS and security services) from other parts of the business, including your manufacturing department. However, in some scenarios, apps and services in the core area need to communicate with apps and services in the manufacturing area. In this lab, you will configure connectivity between the segmented areas. This is a common scenario which is also popular for separating production from development or separting one subsidiary from another.
In this unit, you will:
- Task 1: Create a core services virtual machine and virtual network
- Task 2: Create a manufacturing services virtual machine and virtual network
- Task 3: Connect to a VM using RDP
- Task 4: Test the connection between the VMs
- Task 5: Create VNet peerings between VNets
- Task 6: Test the connection between VMs
Note: An interactive lab simulation is available that allows you to click through this lab at your own pace. You may find slight differences between the interactive simulation and the hosted lab, but the core concepts and ideas being demonstrated are the same.
Estimated time: 30 minutes
Architecture diagram

Task 1: Create a core services VM and network
In this task, you will create a manufacturing virtual network and virtual machine. You will use this VM in a later task to try to communicate with a different VM in a different network. By default, two virtual networks in Azure cannot communicate. You will configure peering to enable communication between networks.
-
From the Azure portal, search for and navigate to Virtual Machines.
-
From the virtual machines page, select Create then select Azure Virtual Machine.
-
On the Basics tab, use the following information to complete the form, and then select Next: Disks >. For any setting not specified, leave the default value.
Setting Value Subscription The subscription that you have access to Resource group az104-rg1(If necessary, select Create new.)Virtual machine name CoreServicesVMRegion East US Availability options No infrastructure redundancy required Image Windows Server 2022 Datacenter: Azure Edition - x64 Gen2 Size Standard_DS2_v3 Authentication type Password Username localadminPassword Provide a complex password 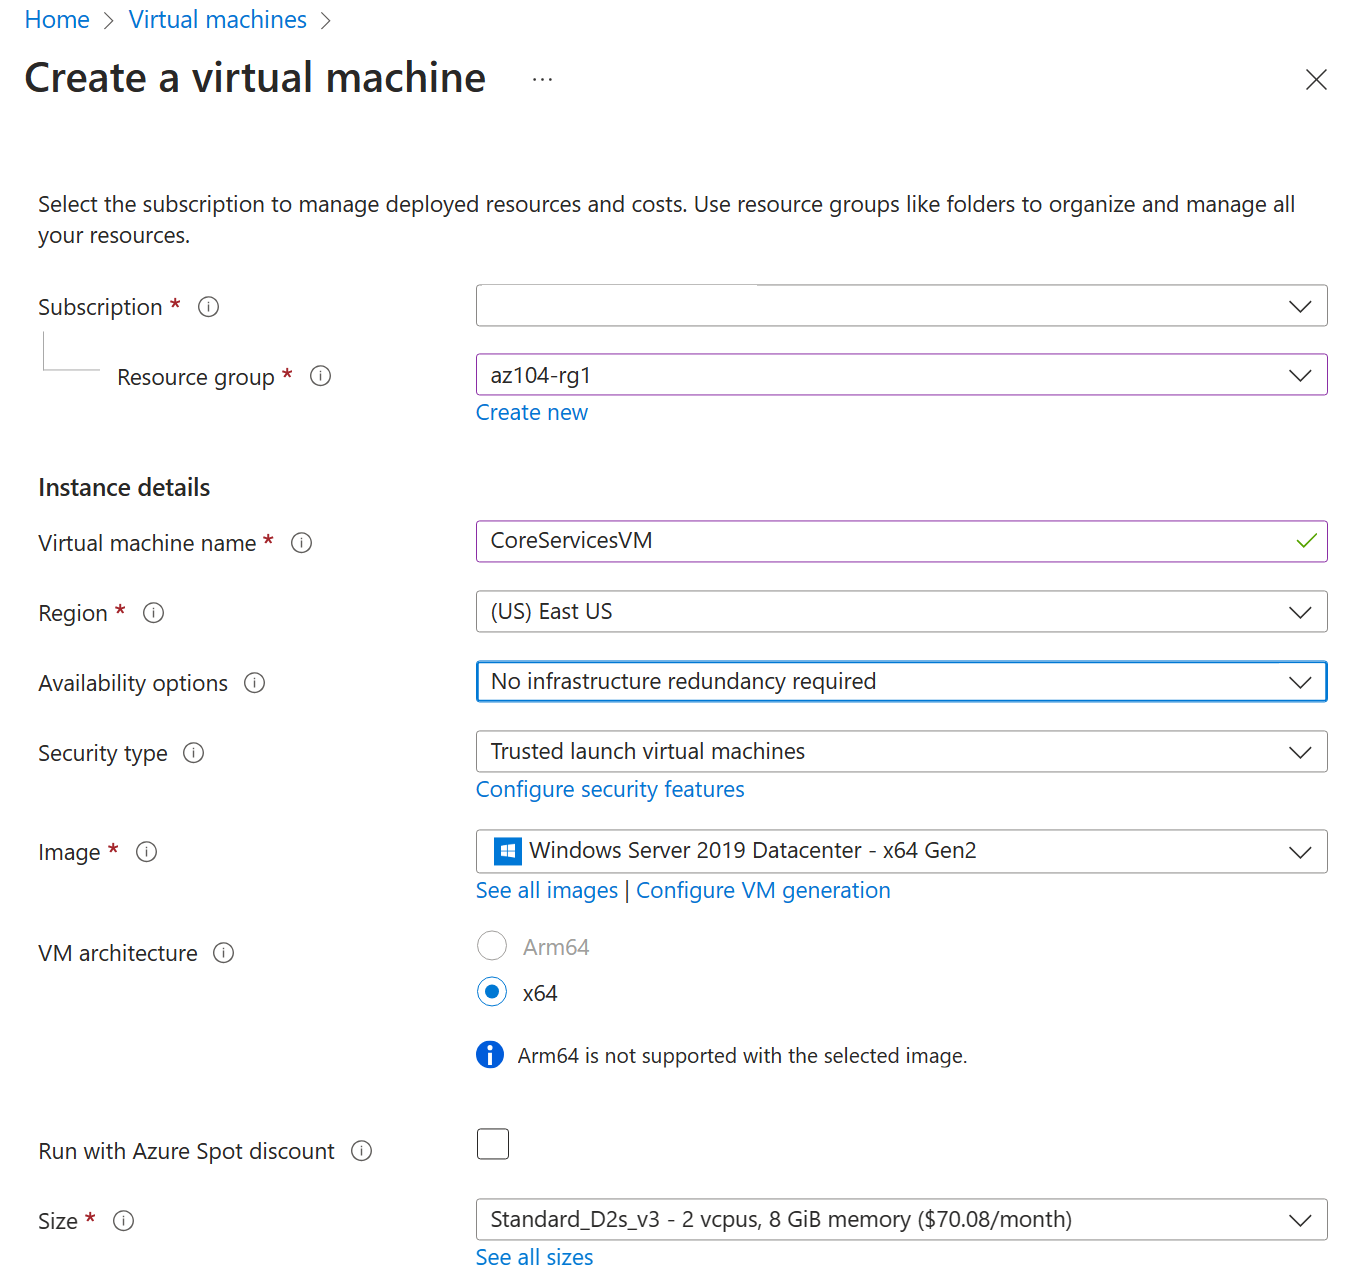
-
On the Disks tab, set the OS disk type to Standard HDD, and then select Next: Networking >.
-
On the Networking tab, for Virtual network, select Create new.
-
Use the following information to configure the virtual network, and then select Ok.
Setting Value Name CoreServicesVNetAddress space 10.0.0.0/16(If necessary, remove or replace the existing address range)Subnet Name ComputeSubnet address range 10.0.0.0/24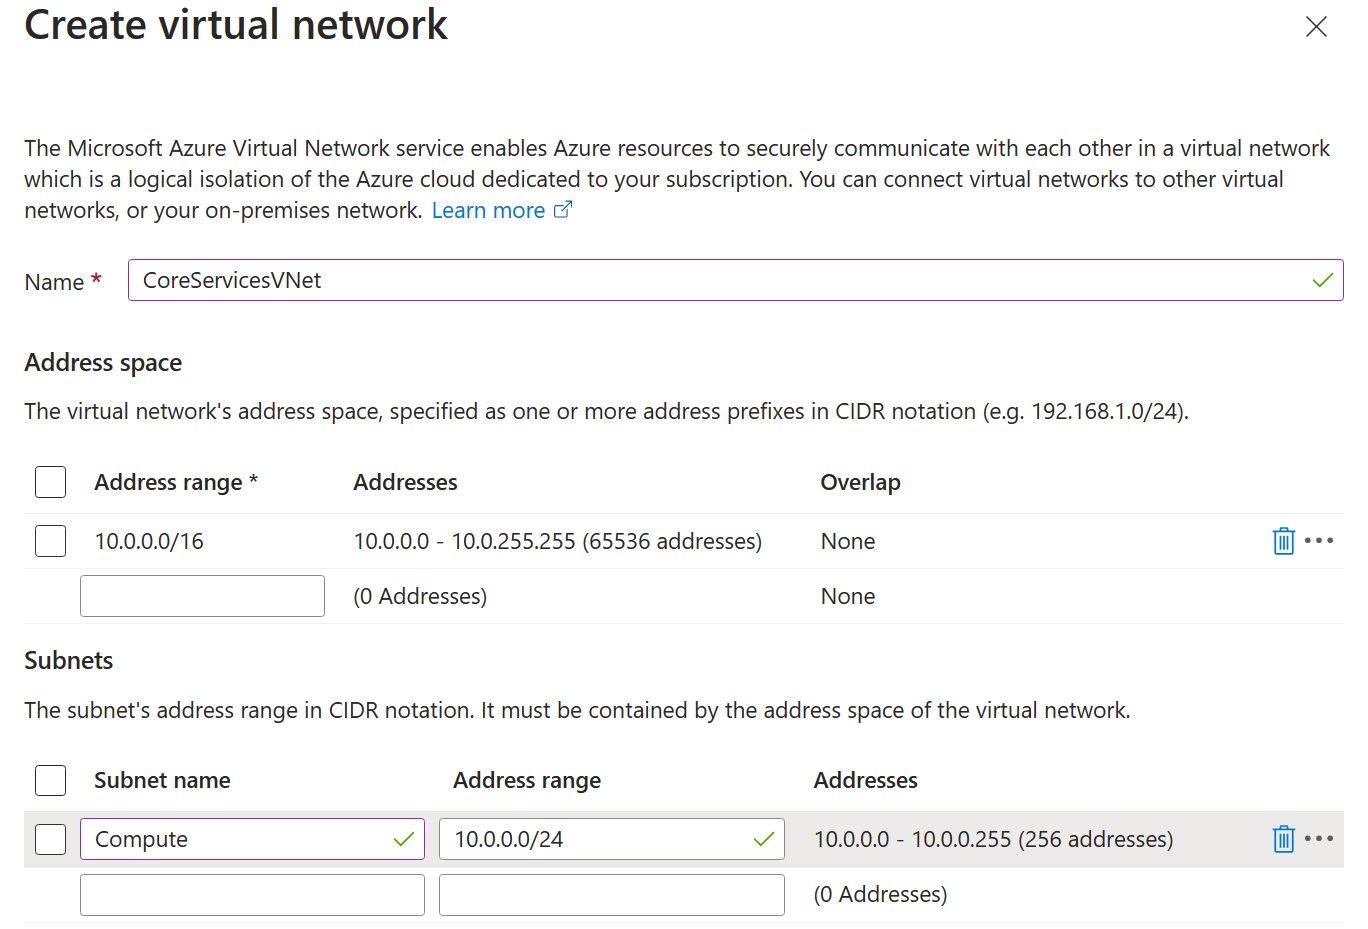
-
Select the Monitoring tab. For Boot Diagnostics, select Disable.
-
Select Review + Create, and then select Create.
Task 2: Create the manufacturing services VM and network
In this task, you will create a manufacturing virtual network and virtual machine. You will use this VM in a later task to try to communicate with the core services VM in a different network.
-
From the Azure portal, search for and navigate to Virtual Machines.
-
From the virtual machines page, select Create then select Azure Virtual Machine.

-
On the Basics tab, use the following information to complete the form, and then select Next: Disks >. For any setting not specified, leave the default value.
Setting Value Subscription The subscription that you have access to Resource group az104-rg1(If necessary, select Create new.)Virtual machine name ManufacturingVMRegion East US Availability options No infrastructure redundancy required Image Windows Server 2022 Datacenter: Azure Edition - x64 Gen2 Size Standard_DS2_v3 Username localadminPassword Provide a complex password 
-
On the Disks tab, set the OS disk type to Standard HDD, and then select Next: Networking >.
-
On the Networking tab, for Virtual network, select Create new.
-
Use the following information to configure the virtual network, and then select Ok.
Setting Value Name ManufacturingVNetAddress space 172.16.0.0/16(Remove or replace the existing address range)Subnet Name ComputeSubnet address range 172.16.0.0/24
-
Select the Monitoring tab. For Boot Diagnostics, select Disable.
-
Select Review + Create, and then select Create.
Task 3: Connect to a VM using RDP
In this task, you will connect to the VMs that you have deployed by using Remote Desktop Connection. This will confirm that they VMs have deployed successfully and you can document the IP addresses that have been assigned to the NICs.
Connect to the ManufacturingVM and verify the private IP address.
-
From the Azure portal, search for and select Virtual Machines.
-
Select the ManufacturingVM virtual machine.
-
On the Overview blade, select Connect.
-
In the Native RDP card, select Select.
-
Save the RDP file to your desktop by selecting Download RDP File. Open the file.
-
Connect to ManufacturingVM using the RDP file. Use the username
localadminand the password you provided during deployment. -
Select Yes to acknowledge the warning that the remote computer cannot be identified.
-
Once the VM loads, select Yes to allow the VM to be discovered on the network.
-
From the Tools menu, select PowerShell. Use the ipconfig command to document the IPv4 address of the machine.
Connect to the CoreServicesVM and verify the private IP address.
-
On the Azure Portal home page, select Virtual Machines.
-
Select CoreServicesVM. On the overview tab, document the private IP address of the VM. It should be 10.0.0.4.
-
On CoreServicesVM, select Connect.
-
On CoreServicesVM | Connect, in the Native RDP card, select Select.
-
Select Download RDP file to download the RDP file to your computer.
-
Save the RDP file to your desktop.
-
Connect to the VM using the RDP file. Use the username
localadminand the password you provided during deployment. -
Select Yes to acknowledge the warning that the remote computer cannot be identified.
-
Once the VM loads, select Yes to allow the VM to be discovered on the network.
-
From the Tools menu, select PowerShell. Use the ipconfig command to document the IPv4 address of the machine.
Task 4: Test the connection between the VMs
In this task, you will test whether the VMs can communicate with each other. This is a common troubleshooting step when setting up new networks, new VMs, or adjusting network security settings.
-
On the ManufacturingVM, open a PowerShell prompt.
-
Use the following command to verify that there is no connection to CoreServicesVM on the CoreServicesVnet. Be sure to use the IPv4 address for the CoreServicesVM.
Test-NetConnection 10.0.0.4 -port 3389 -
The test connection should fail, and you will see a result similar to the following:

Task 5: Create VNet peerings between CoreServicesVnet and ManufacturingVnet
In this task, you will create peerings to enable communications between VNets.
-
On the Azure home page, select Virtual Networks, and then select CoreServicesVnet.
-
In CoreServicesVnet, under Settings, select Peerings.
-
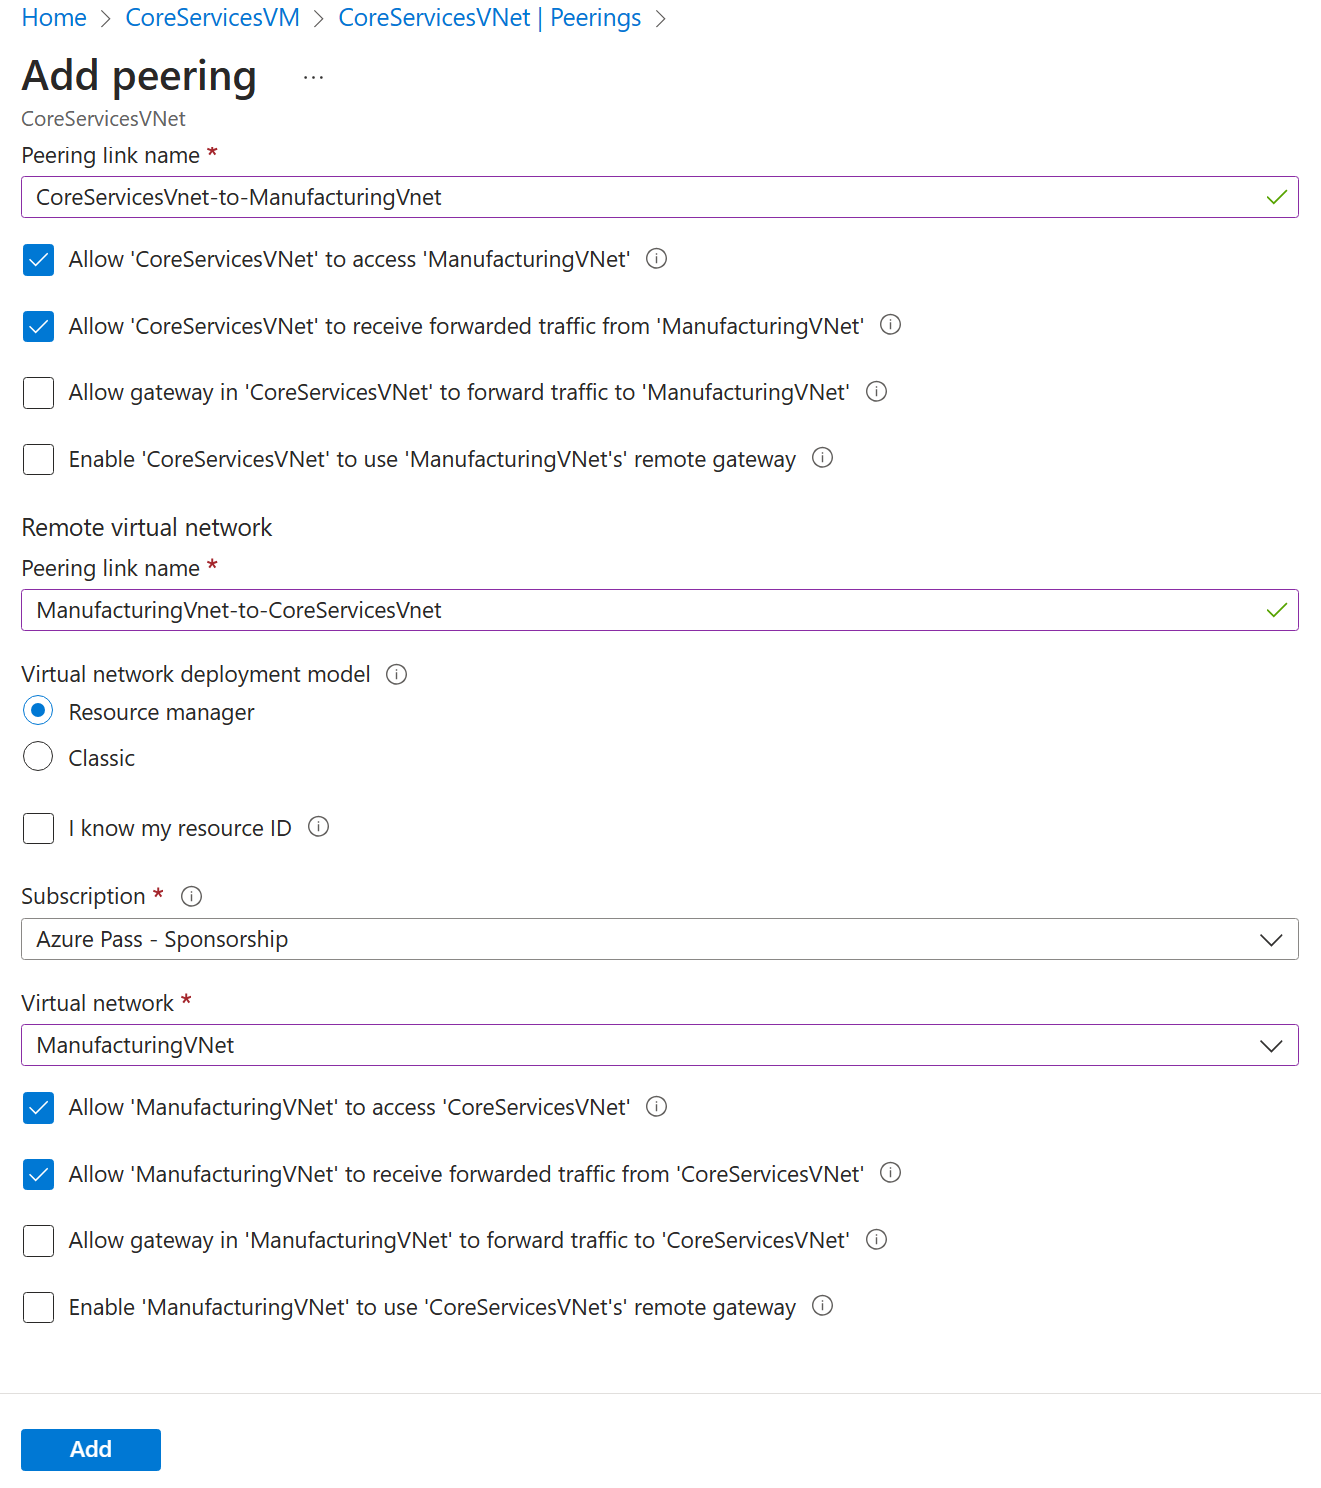
On CoreServicesVnet | Peerings, select + Add.
-
Use the information in the following table to create the peering.
Section Option Value This virtual network Peering link name CoreServicesVnet-to-ManufacturingVnetAllow CoreServiceVNet to access the peered virtual network Allow (default) Traffic forwarded from remote virtual network Allow Virtual network gateway or Route Server None (default) Remote virtual network Peering link name ManufacturingVnet-to-CoreServicesVnetVirtual network deployment model Resource manager I know my resource ID Not selected Subscription Select your subscription Virtual network ManufacturingVnet Traffic to remote virtual network Allow (default) Traffic forwarded from remote virtual network Allow Virtual network gateway or Route Server None (default) -
Review your settings and select Add.
-
In CoreServicesVnet | Peerings, verify that the CoreServicesVnet-to-ManufacturingVnet peering is listed.
-
Under Virtual networks, select ManufacturingVnet, and verify the ManufacturingVnet-to-CoreServicesVnet peering is listed.
Task 6: Test the connection between the VMs
In this task, you will check whether the VMs can communicate with each other. You can use a variety of tools and methods for this testing. In this task, you'll use PowerShell which provides an easy and quick way to perform the test.
-
On the ManufacturingVM, open a PowerShell prompt.
-
Use the following command to verify that there is now a connection to CoreServicesVM on CoreServicesVnet. Ensure that you use the IP address of the VM as documented earlier in the lab.
Test-NetConnection 10.0.0.4 -port 3389 -
The test connection should succeed, and you will see a result similar to the following:

Congratulations! You have successfully created VMs, created peerings, and tested communications between virtual machines.